
The amp was in a really bad shape when it came in, full of dust and grime, with the speaker disconnected and a few bolts missing... I opened the amp, gave it a thorough cleanup and checked every component.
Here is the K-50 schematic:
http://elektrotanya.com/dean_markley_k-50_sch.pdf/download.html
DIY REPAIR!
(Note: some repair tips apply to tube amps as well! Just beware of the high voltages when working on amps!)
Here is the list of things you'll have to do when repairing an old SS amp:
-unplug it from the mains outlet and wait for and hour
-remove any visible dust before opening the amp(to prevent dust from falling in the amp chassis and electronics)
-disconnect the speaker(s) and undo the screws that hold the amp's metal chassis in place.
-remove the chassis from the wooden cab and you'll be able to see the electronics
-clean the pcb board using an air can spray (compressed air) or a vacuum cleaner.
FUSES:
The 1st step is to check the fuses inside the amp chassis and on the pcb. Use a DMM (digital multimeter) to check for fuse continuity. If all fuses are okay, proceed to the next step.
PCB components:
-when all dust is gone, remove the pcb board from the chassis carefully and check the entire board for:
rusty parts, burnt parts, discoloured pcb areas, bad/damaged capacitors, bad/cold soldering joints, cut cables, unplugged wire connectors, cut/etched pcb traces.
Pots
- a standard step is to clean all the pots as they tend to get scratchy and dusty. Just spray some WD40 or some contact cleaner inside the pot via the small opening on its side. Then use the pot and turn it all the way back and forth quite a few times to clean it properly. If a pot is still scratchy and does weird noises when the amp works, maybe it's time to replace it. Just be careful to use a same type pot in terms of size, resistance value (e.g. 10K, 100K, 500K, 1M) and type (logarithmic or linear type usually).
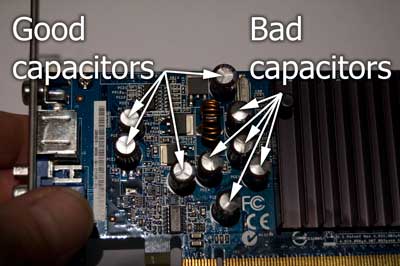
Capacitors
You know that an electrolytic capacitor has gone bad when it's bulging or leaking fluids/stuff. It usually looks like that:
http://www.maximumpc.com/files/u69/Bad_Caps.jpg
http://upload.wikimedia.org/wikipedia/commons/7/79/Bad_Capacitor_01.jpg
http://s187.beta.photobucket.com/user/spixh/media/ga-7vrx_bad_capacitors_zoom.jpg.html
http://www.geeksinphoenix.com/blog/images/Computer_Randomly_Freezes_Up_01.jpg
http://www.mikerepairscomputers.com/blog/wp-content/uploads/2009/07/Badcaps-tayeh-4.jpg
http://smarterotti.com/image.axd?picture=Bad-Dell-Capacitors-2.jpg
http://ww2.justanswer.com/uploads/TV/TVTech1/2012-09-18_132842_caps_bulged.jpg
http://www.buildingeleanor.com/images/2009/SM_940mw_caps.jpg
If you see capacitors that look like that on your amp pcb, you 'll have to change them with brand new ones. You know that capacitors are ageing over time, right?
Resistors
- Burnt resistors could be a little hard to spot as they don't usually look black. They could be a bit darker on the outside or have their colour code erased. Not sure what resistor value to use once you have removed an old one? Here's a resistor color code calculator:
http://www.csgnetwork.com/resistcolcalc.html
Opamps/transistors
The chips/transistors are usually soldered directly on the circuit board. That's bad for the diy repair as it's always tricky to replace an old IC chip that isn't placed on a IC base. So, be sure the check the chip(s) for signs of wear such as white stains, rusty pins, burnt areas or a crack.
If a chip has to be replaced, it is best to solder a chip base on the pcb and then place the chip on it. Some opamp chips perform better than others, so do your homework before you replace them.
- Speaker(s):
Always check the speaker cones for cuts, holes, stains, or disfigured areas. If the cone is damaged, consult a local tech or just replace the speaker altogether. Replace it with a same size and impedance one. If the cone is okay, check the speaker terminals for continuity with a DMM and also check the dc resistance(usually 3-16ohm). If the speaker has ultra high resistance or shows no sign of continuity, the speaker coil may be damaged.
-The repair:
Here are a few pics during the K-50 repair. The amp had some bad solder joints and a wire cut so I fixed it!


Thanks Thanos for the info, it has really helped. I have cleaned up the board, checked solder, connections, and cleaned the pots which made a huge difference. It seems the OD switch is not working. The LED light stays on no matter that the OD doesn't work (every once in a while the swich seems to work). Would you have an internet source that sells the switches? and can a DIYer usually replace one?
ΑπάντησηΔιαγραφήThanks again,
Clint
Hello!
ΔιαγραφήThe channel switch should definitely be replaced in this case. I think the led is connected to the switch. It's a pretty simple switch you can find on ebay or the following links. Here are some suppliers: www.mouser.com , http://www.banzaimusic.com, http://www.musikding.de
You can remove the old switch and take it to an electronic components/kits store. Then solder the new switch in place and check the amp.
Cheers,
Thanos